My
No-code
journal

The step-by-step tutorial to build your own digital journal in less than 29 minutes without writing a line of code! 😀

Hi I'm Ash!
I'm joining the 100 Days of No-Code Challenge to meet a great community of makers and also help others express themselves creatively on the web. My favourite tools are Carrd and Airtable. I'm looking forward to learning more about website design and finding new ways to automate tasks.
Ash's 100 Days of No-Code Journal
Here's a sample of a daily journal you can make for free with no-code! I've tracked my progress in the 100 Days of No Code challenge learning and building across four categories: study (reading articles, books and tutorials), community (interacting and meeting up with members of the challenge), building (applying the knowledge to create new features) and shipping (launching something new, ready to share!).
My
No-code
journal
Tutorials
1. Create your journal with Airtable
2. Create your website with Carrd
3. Set up a daily reminder
4. Post directly to Twitter
5. Personalize your website
Welcome to the five step tutorial to making your own digital journal online!This is the perfect guide for no-code beginners looking to make their first thing online using two highly recommended tools, Airtable and Carrd.Track your own daily challenge, product progress or thoughts to share with others!The first three parts are available now!Get your free access by entering your email below.
My
No-code
journal
Tutorials
Okay, let's get started!Bookmark this page as a reference and use the buttons on the upper right to create your very own digital journal!
Part 1: Setting up Your Journal Using airtable
🛠️ **What you'll make: **
An Airtable spreadsheet to record your progress through the #100DaysOfNoCode challenge. We'll also learn how to use the different views to share later.📝 **What you'll need: **
Desktop/laptop access
Distraction free workspace
A strong password
An open mind towards spreadsheets
1. Set up your Airtable account (if you already have an account skip to step 2)
Let's first get you set up with an account that will give you a great foundation for this project and plenty of NoCode projects in the future.Head on over to www.airtable.com and create an account.
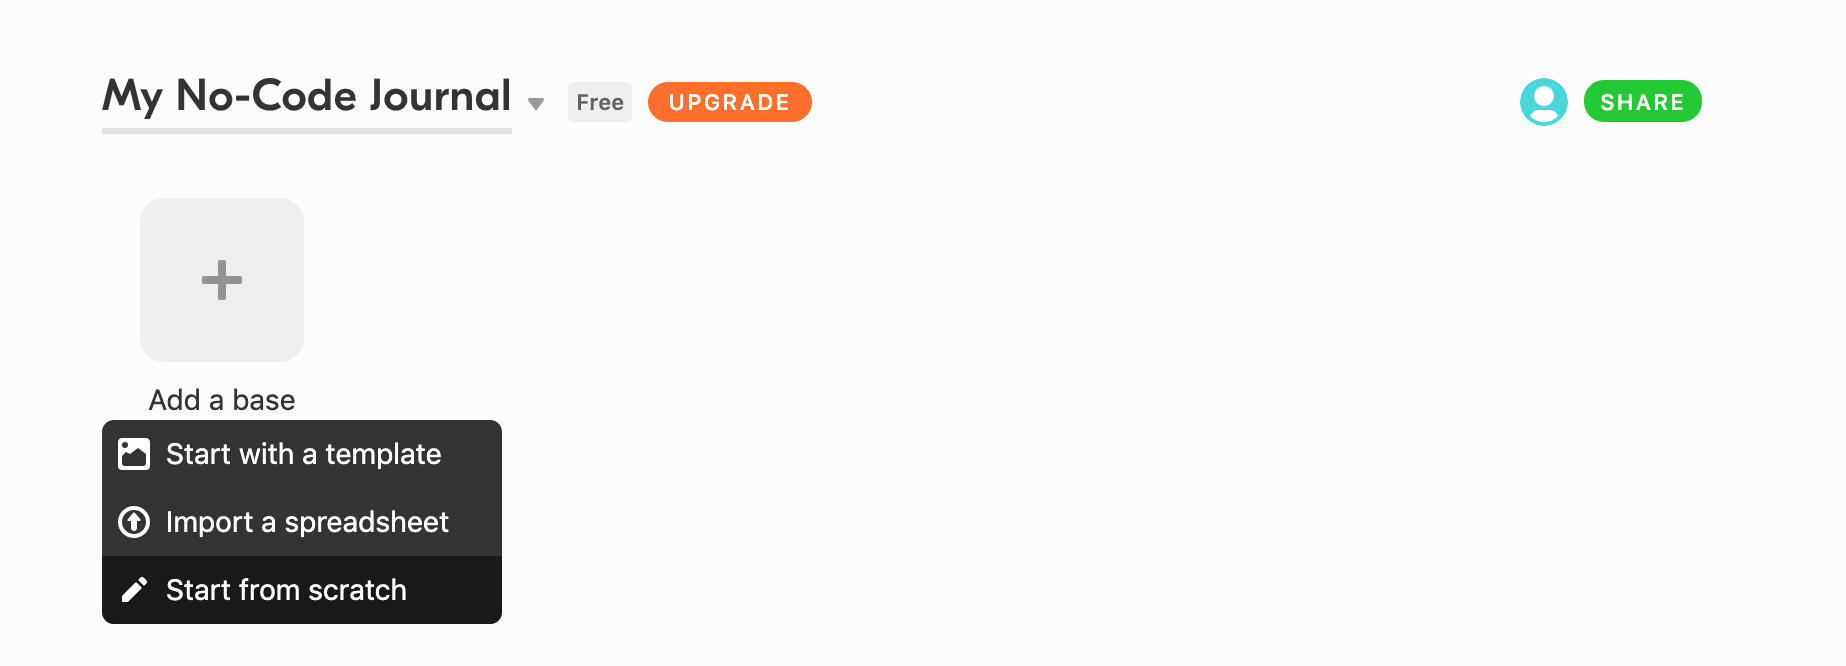
2. Create a base for your journal
When you first come to the homepage Airtable will suggest a few templates to get started. Feel free to browse these in a bit but I'll show you how to customise your own.Instead hop down and create your own base. This is the same of creating a new Excel file or workbook but with a few extra features 😉
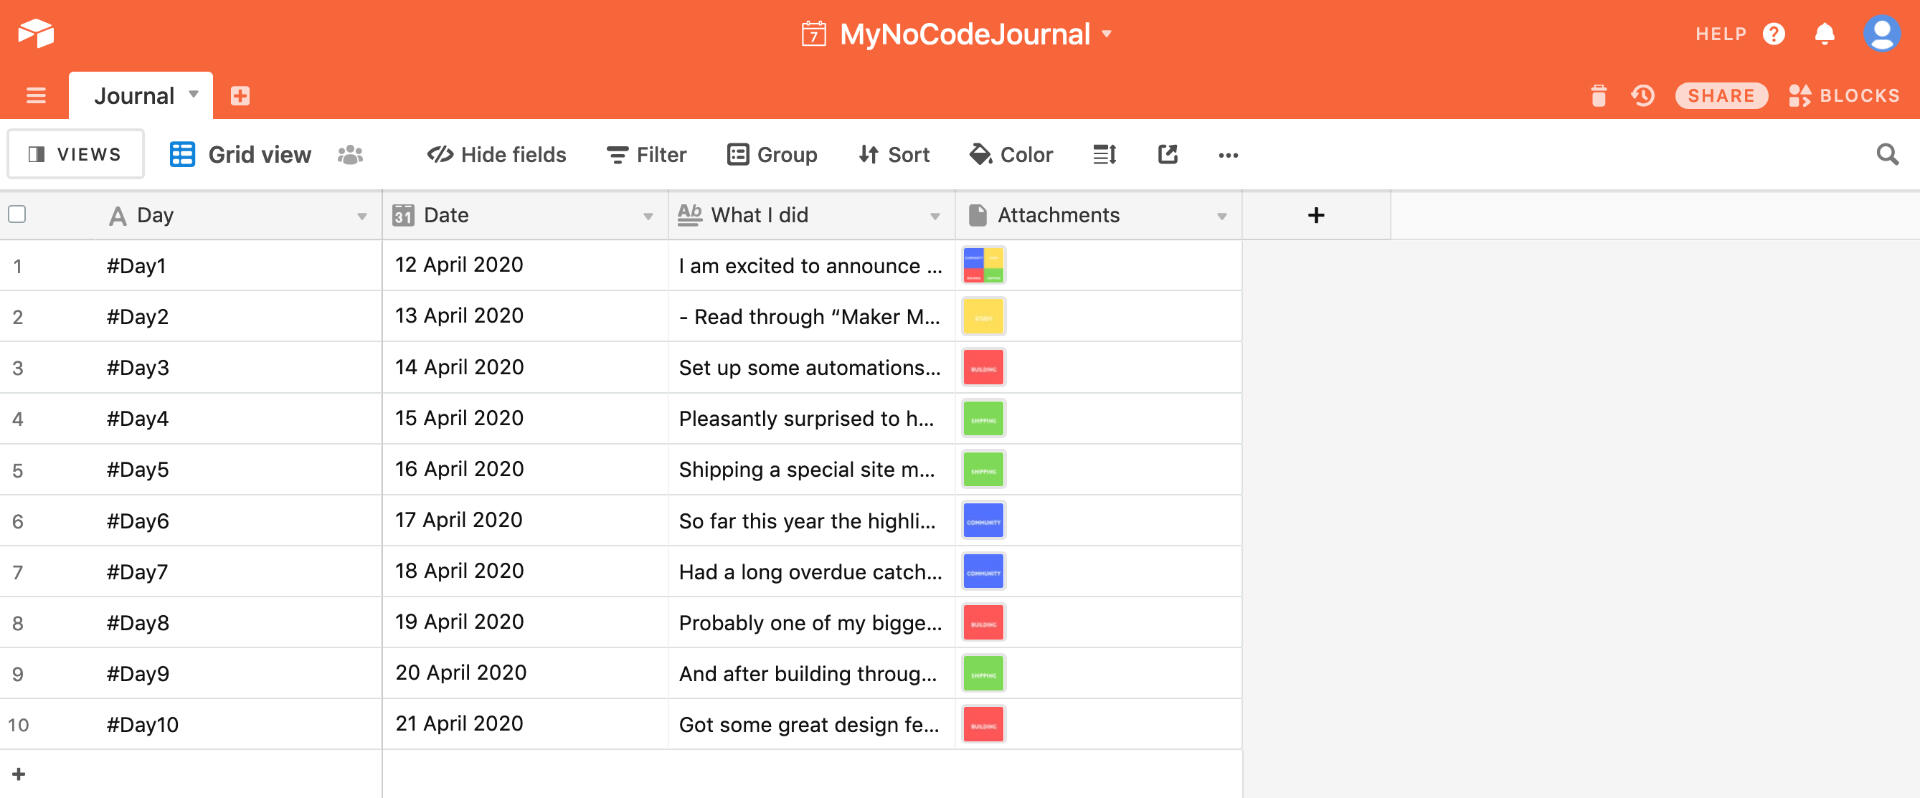
3. Creating columns - setting up your daily inputs
Every time you create a base from scratch you'll be set up with 3 columns: Name, Notes, and Attachments.Take note, that one of the really cool Airtable features is that you can customise the types of data you put in that column from a URL, long form text or even a rating. This will come in handy for future projects but for now set up your columns so you have:
Day of the challenge
Date
What you did or learned
Attachment (can be a photo, screenshot or any other visual)

4. Set up a few test entries
If you are already a few days into your challenge feel free to populate the rows with your progress so far.If this is day one for you add in an introduction about yourself and what you're looking forward to.Play around with adding images to really customise the look of your journal and document your milestones. For example I've added a simple colour coding system to each of my days and assign them by the type of progress. We'll see how we can use them in the next step.
5. "I Like The View" - Choose how you want your calendar to look
Here's another great feature of Airtable - using different views.One of my favourite is the gallery view which transforms your spreadsheet into a window of tiles to browse through.With a few customised settings you can toggle a cover image so people can easily see what your highlight of the day was.For the 100 Days of No Code Challenge I've added an image showing the category for the day. This can be anything you want - a daily dish, illustration or high score - up to you!

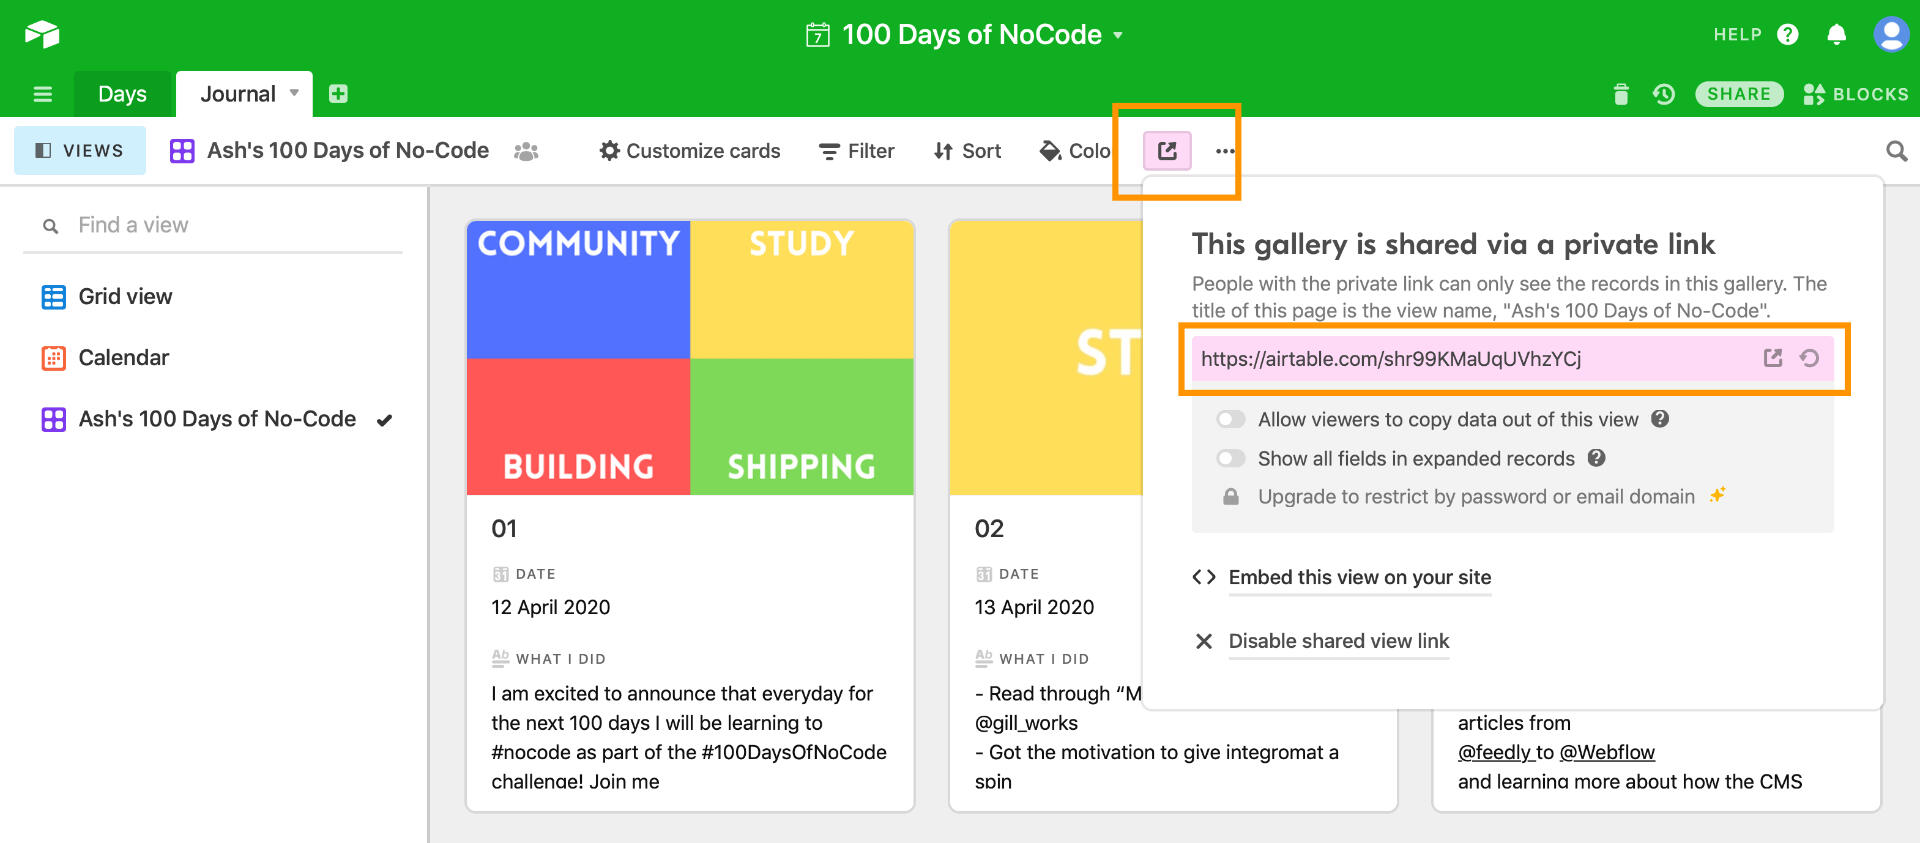
6. Make your journal shareable!
Finally let's set up a link where you can share your journal.Airtable gives you a couple options which we'll explore in Part 2.For now, navigate to the export button (not the 'share' button - I mix these up all the time too). Copy the link and paste in your browser. This is how your journal will look when you share it.
Pretty cool what you can do with spreadsheets, eh?When you've got your journal set up the way you like it, it's time to add it to your very own website in Part 2.
Part 2: Creating your own website with carrd
🛠️ **What you'll make: **
Your very own space on the Internet to share your profile, progress and learning journey!📝 **What you'll need: **
Desktop/laptop access
Distraction free workspace
A strong password
A photo of your amazing self
Credit card for Pro account (optional)
1. Pick a template to start with
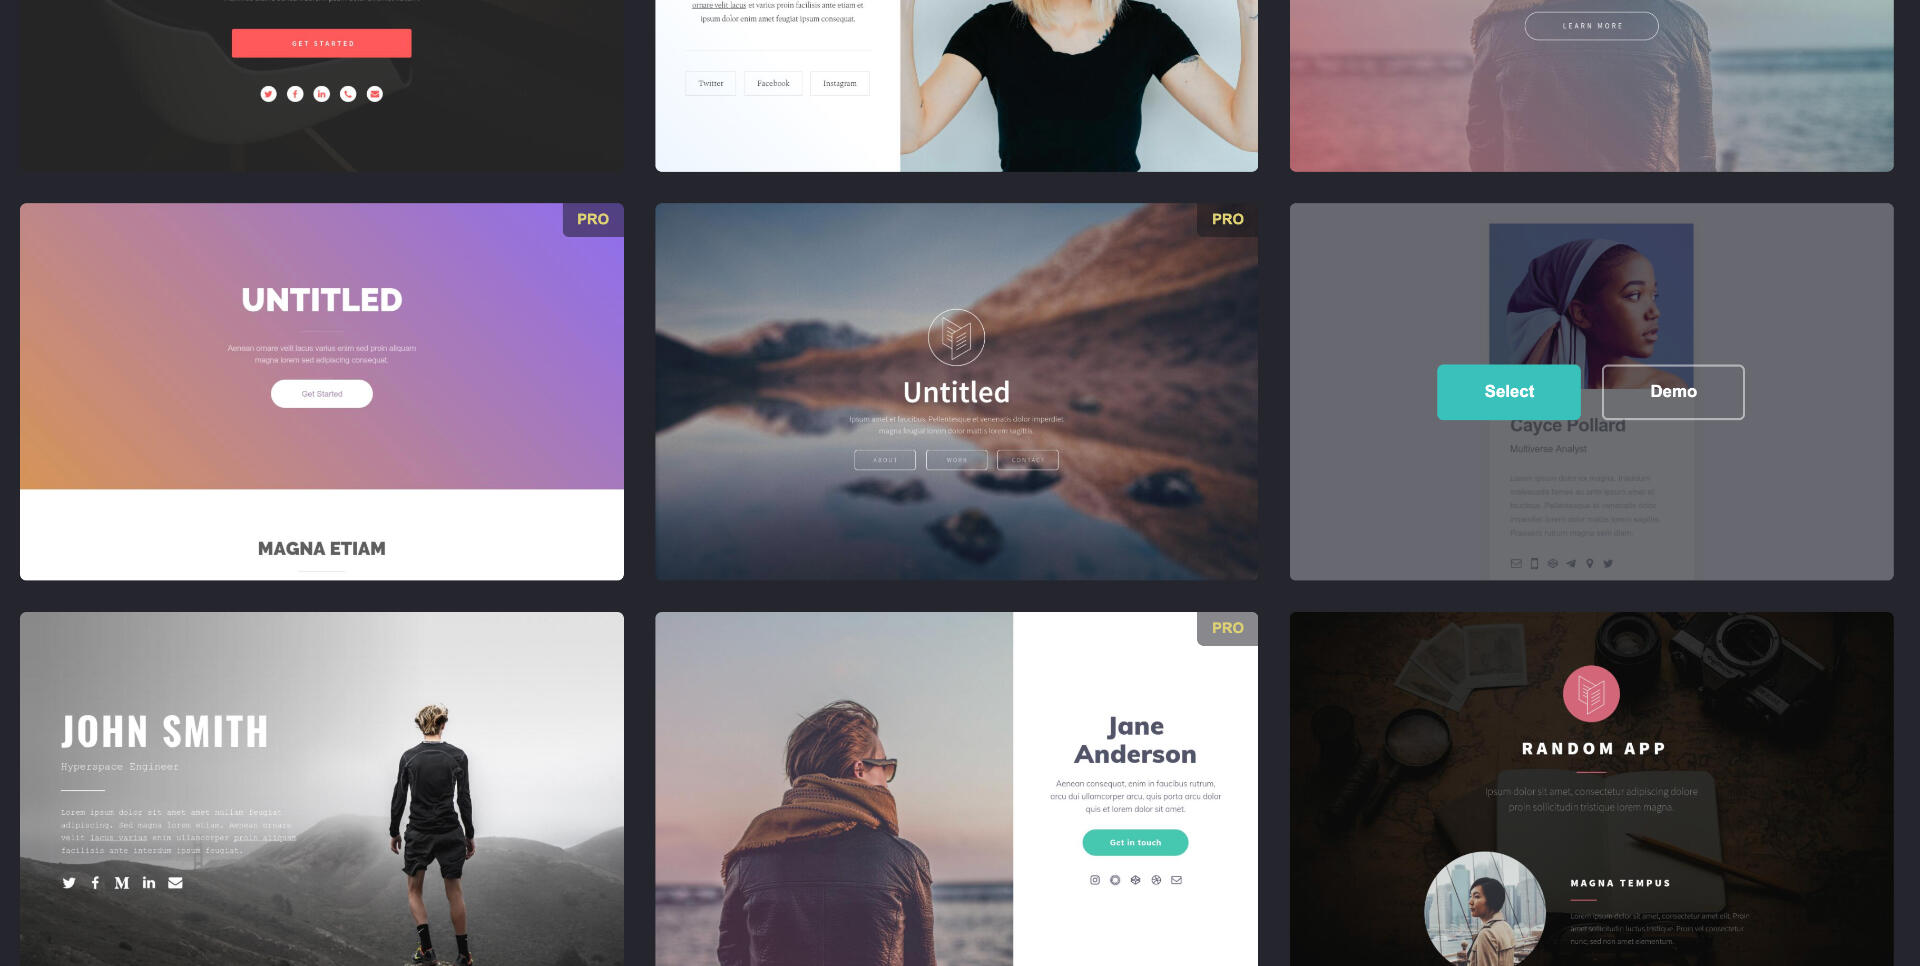
Open a new tab and head to Carrd.co (yes, you spell it with an extra 'r' - pronouncing it like a pirate is optional).We can get started without creating an account just yet. Click on 'Choose a Starting Point'.You see a variety of pre-made templates ready for you to drop in your content. If you're comfortable with website builders feel free to pick a template of your choice however I'll select a mobile friendly template for this tutorial. Select the Cayce Pollard template (#51 as shown in the image below) as a starting point - no pro account* needed at this point!(Don't worry, you can choose more templates and create ones with your own style after this tutorial.)
*A note on pro features: Carrd offers multiple plans with a variety of features and also gives you a 14 day trial of Pro features. For a no-code maker this is a really great deal for the 100 Days of No-Code challenge but I'll show you how use both the free and premium features.
2. Get familiar with the editor
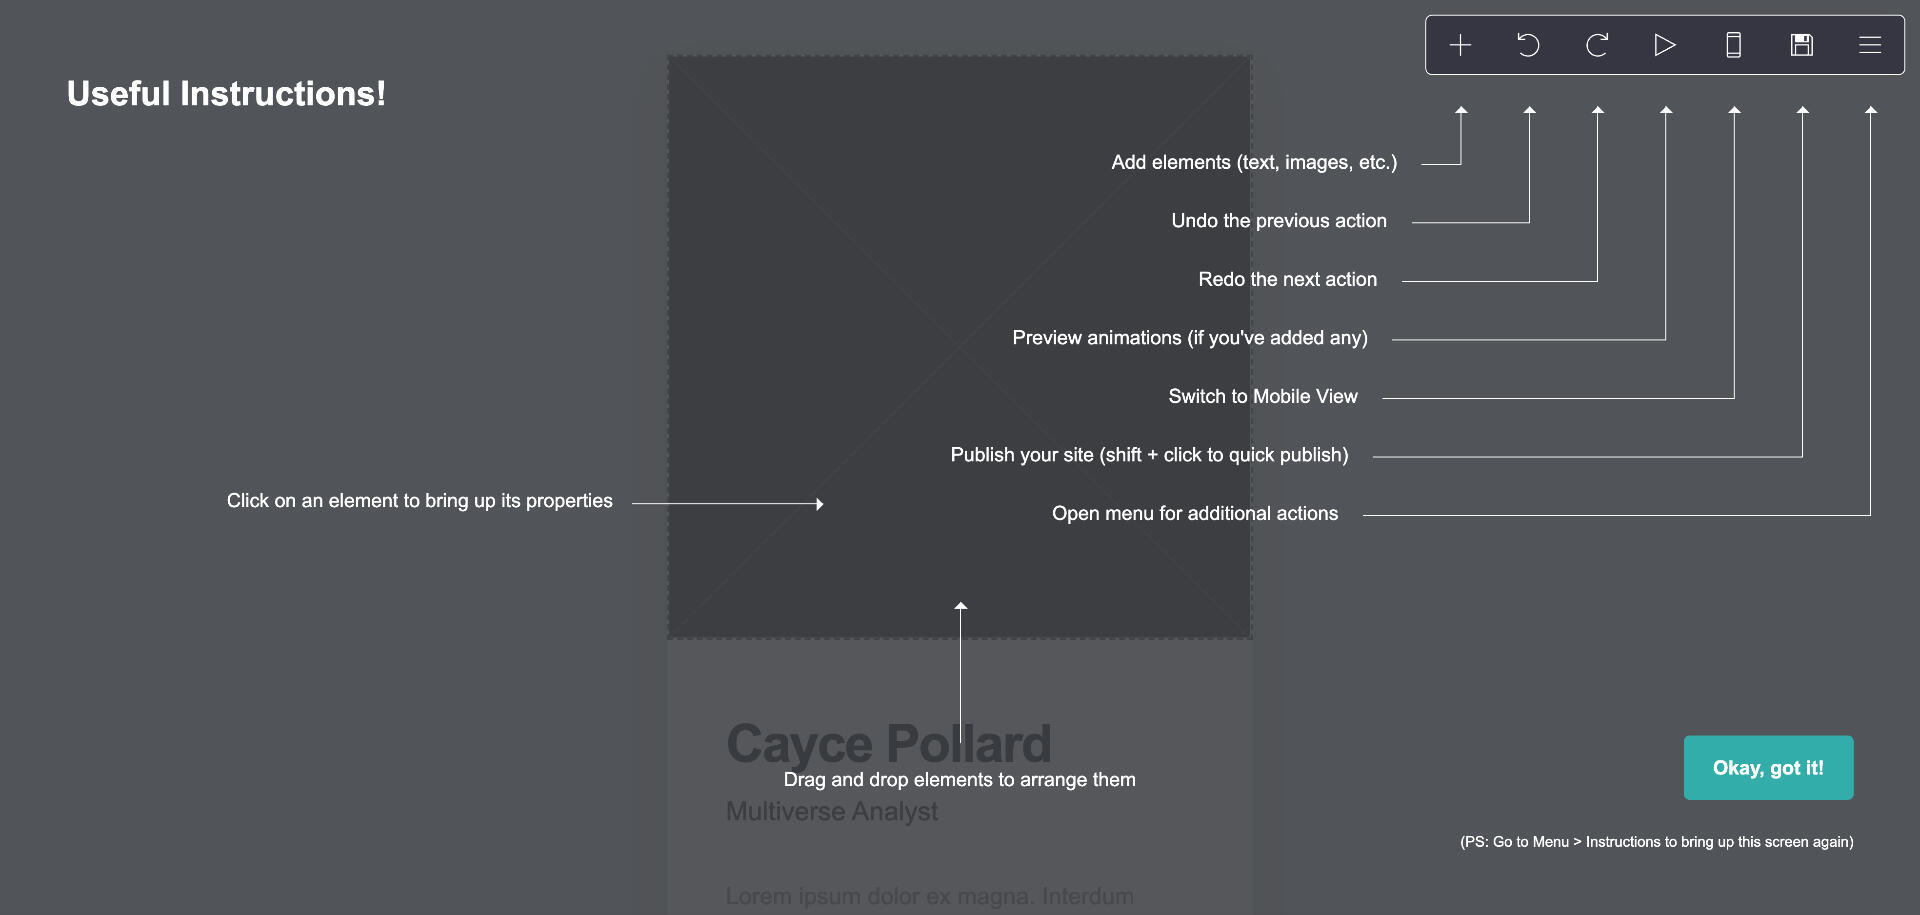
Carrd has a minimal editor providing you with drag and drop building blocks you can customise without any code!If you ever want an overview of the builder space, click on the menu icon and select 'Instructions'. You'll see an overlay like the image below.If you ever need some more tips on creating elements or using Carrd then you can click on the menu icon and selecting 'Documentation'.
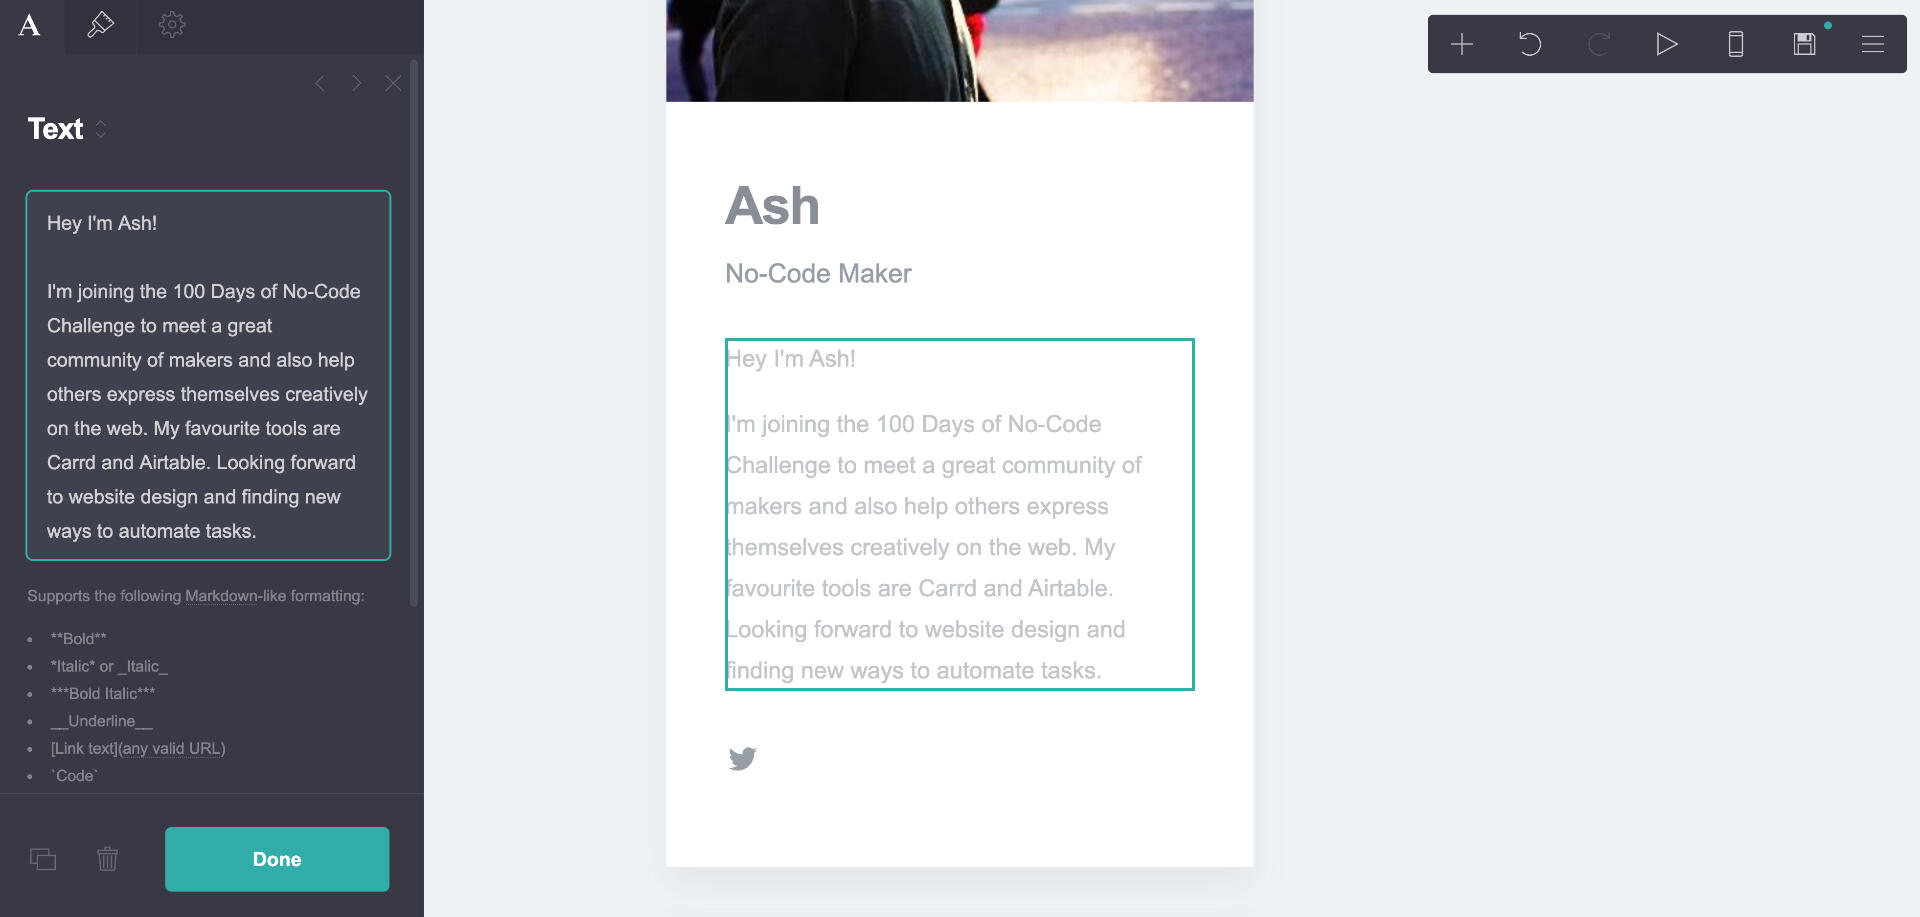
3. Add your story!
Remember this is YOUR journal so we'll start by adding a bit of personality. Start out by uploading an image that describes you and your challenge best.Click on each of the text fields to add your name, a title you want to add and a bit about the challenge you're taking.
Finally if you have some social accounts you can link them at the bottom there by adding in the icon and pasting in the URL.Lookin' good!
4. Link your Airtable journal
Alright, are you ready for some magic?Here's where we take things to the next level and start integrating different digital tools ✨Let's link our Airtable journal we made in Part 1 to our website so we can showcase our progress. We'll add it just under our bio and can do this in three ways:
Using a link
Using a button
Embedding the table on our site
Don't worry, I'll show you how to do each.
4a. Using a link
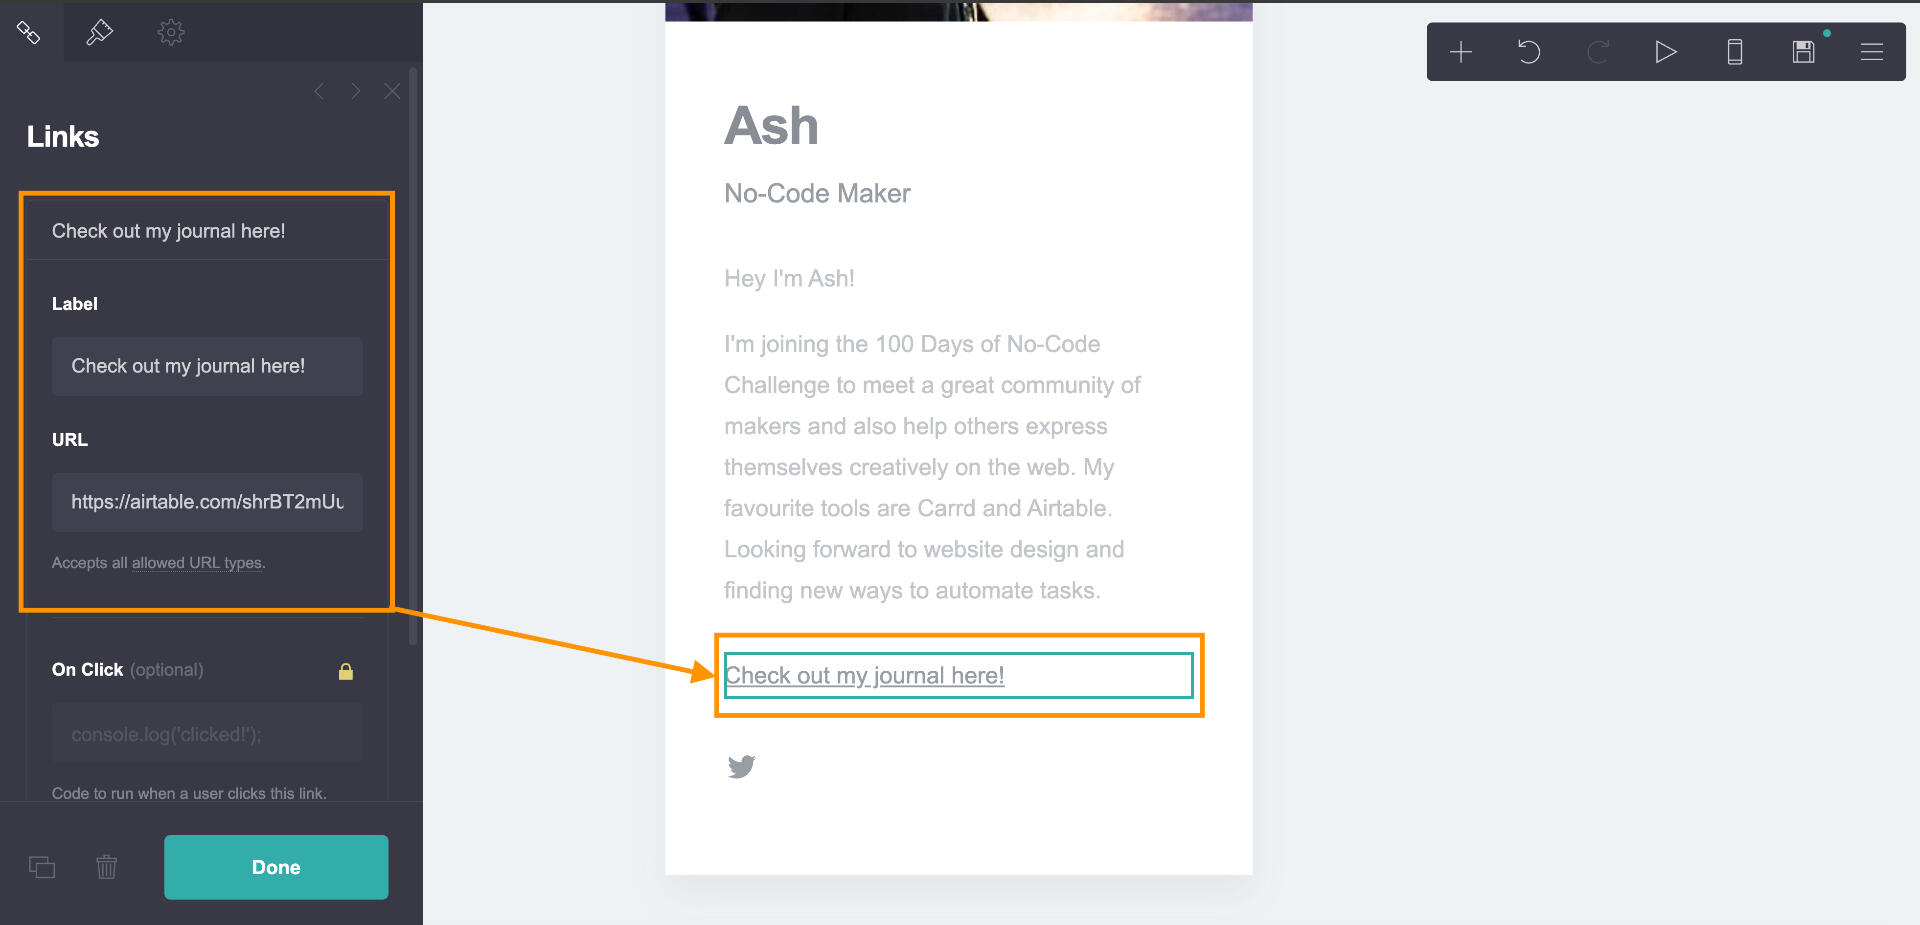
Links are essentially clickable text that will take the user to a determined URL. To link your website visitor to your Airtable journal click on the + in the editor and select 'Links'.
You'll create a new element that will default with the text 'Link'.Open up the side bar editor to rename your link and add your Airtable journal URL you want your visitors to see.
You can also add a link in the middle of a text block a bit more discretely by following the Markdown formatting tips below the text input box.
⭐ Pro Tip: To have your links open up into a new tab instead of changing the page add '/@blank' to the end of any URL
4b. Using a button
A button is very similar in behaviour to a link where your linked Airtable journal will display in a separate tab.
Use a button when you really want your call to action to stand out on the page.

4c. Using an embed
Using this element is a Pro feature that allows you to display your Airtable journal directly on your website. This is one less click for your visitor to view the great progress you're making. Keep in mind the more data in your journal the longer it may take for the page to load so it's also good to note not to go overboard. See all the steps here.
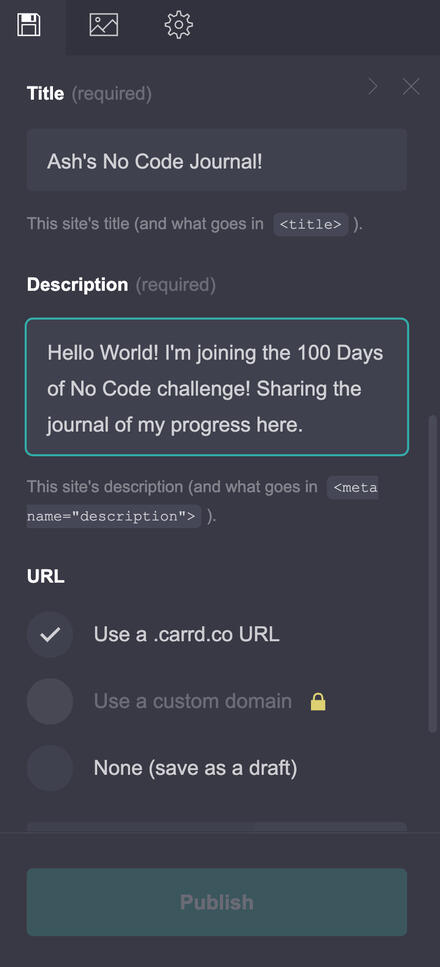
5. Get ready to publish!
We're in the home stretch now!All we have to do is save our work and publish our site to the world 🌐When you are happy with your photo, bio and have added your link let's publish the site to a carrd.co domain. (Don't worry - you can made as many updates as you want after the site is published.)Click on the save icon in the menu bar and save your site.
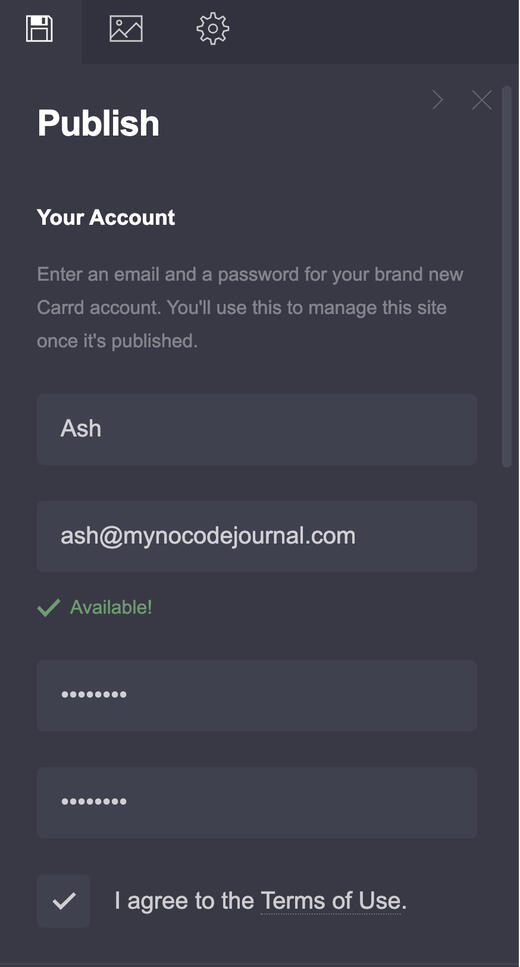
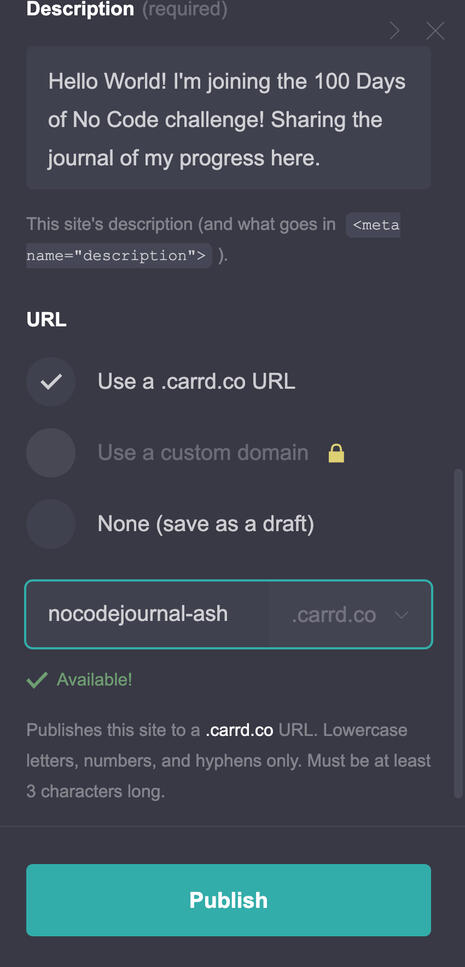
When you're ready hit 'Publish'.
If this is your first Carrd site you'll just need to verify your email. With great power comes great responsibility.
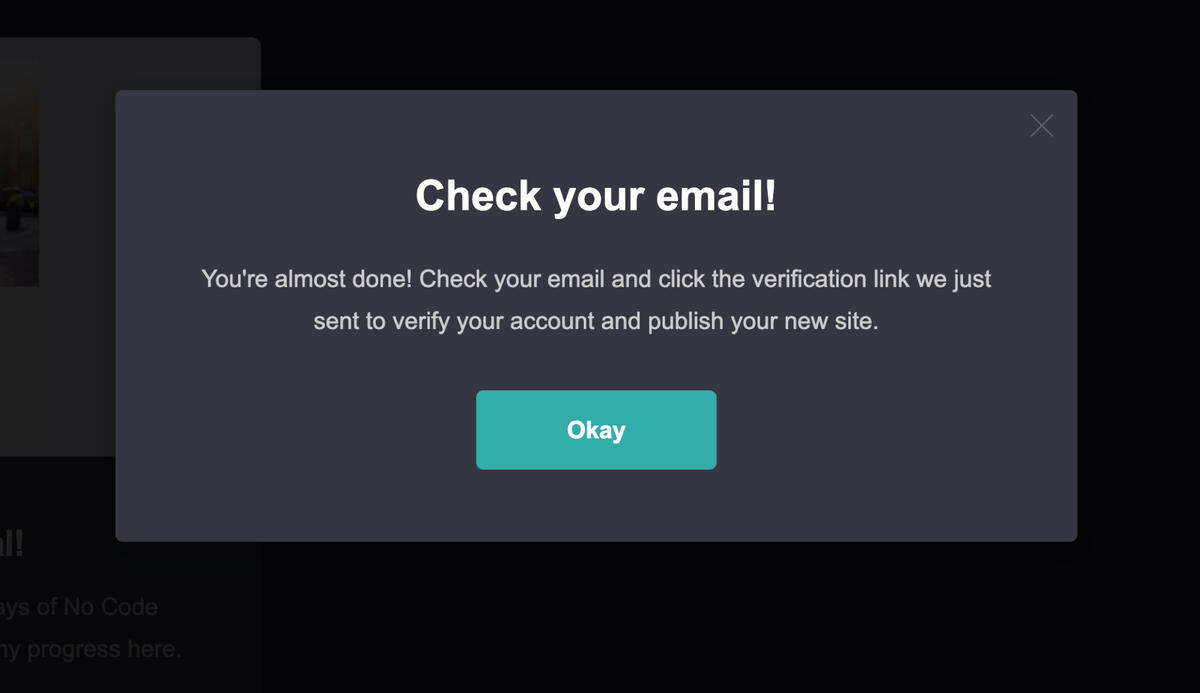
Once your email is verified your site should be up within a few minutes. Congrats on building your own new home on the web!In the next section we'll learn how to make your journal a daily habit through the 100 Days.
Part 3: Setting up daily reminders
🛠️ **What you'll make: **
Automatic reminders that work with your smartphone to remind you to save your daily progress. You'll learn how to create a form in Airtable that can be accessed anywhere with the link. This is a great skill that will allow you collect data for all sorts of no-code projects in the future.📝 **What you'll need: **
Your preferred mobile device
Access to your journal's Airtable base
Atomic Habits by James Clear (optional)
1. Make it a habit
Good news, after the first two parts the third section is very simple, however no less important.One of the keys to success on any challenge is making it a daily habit, which is why it deserves its own step in the tutorial.There's multiple studies pointing to the drop-off rate for resolutions or goals so let's set you up with some advice from the master of habits James Clear himself.In his book he notes 4 key ways to make a habit stick:
Cue - Make it obvious
Craving - Make it attractive
Response - Make it easy
Reward - Make it satisfying
This part of the tutorial is to make it easy to log your progress each day without having to log into your Airtable account multiple times.Instead we'll create a link you can access anywhere to upload your progress as you go.
2. Create your conversation
Let's hop back into your Airtable base from Part 1 and go to the views section.
Here we'll select 'Form'.
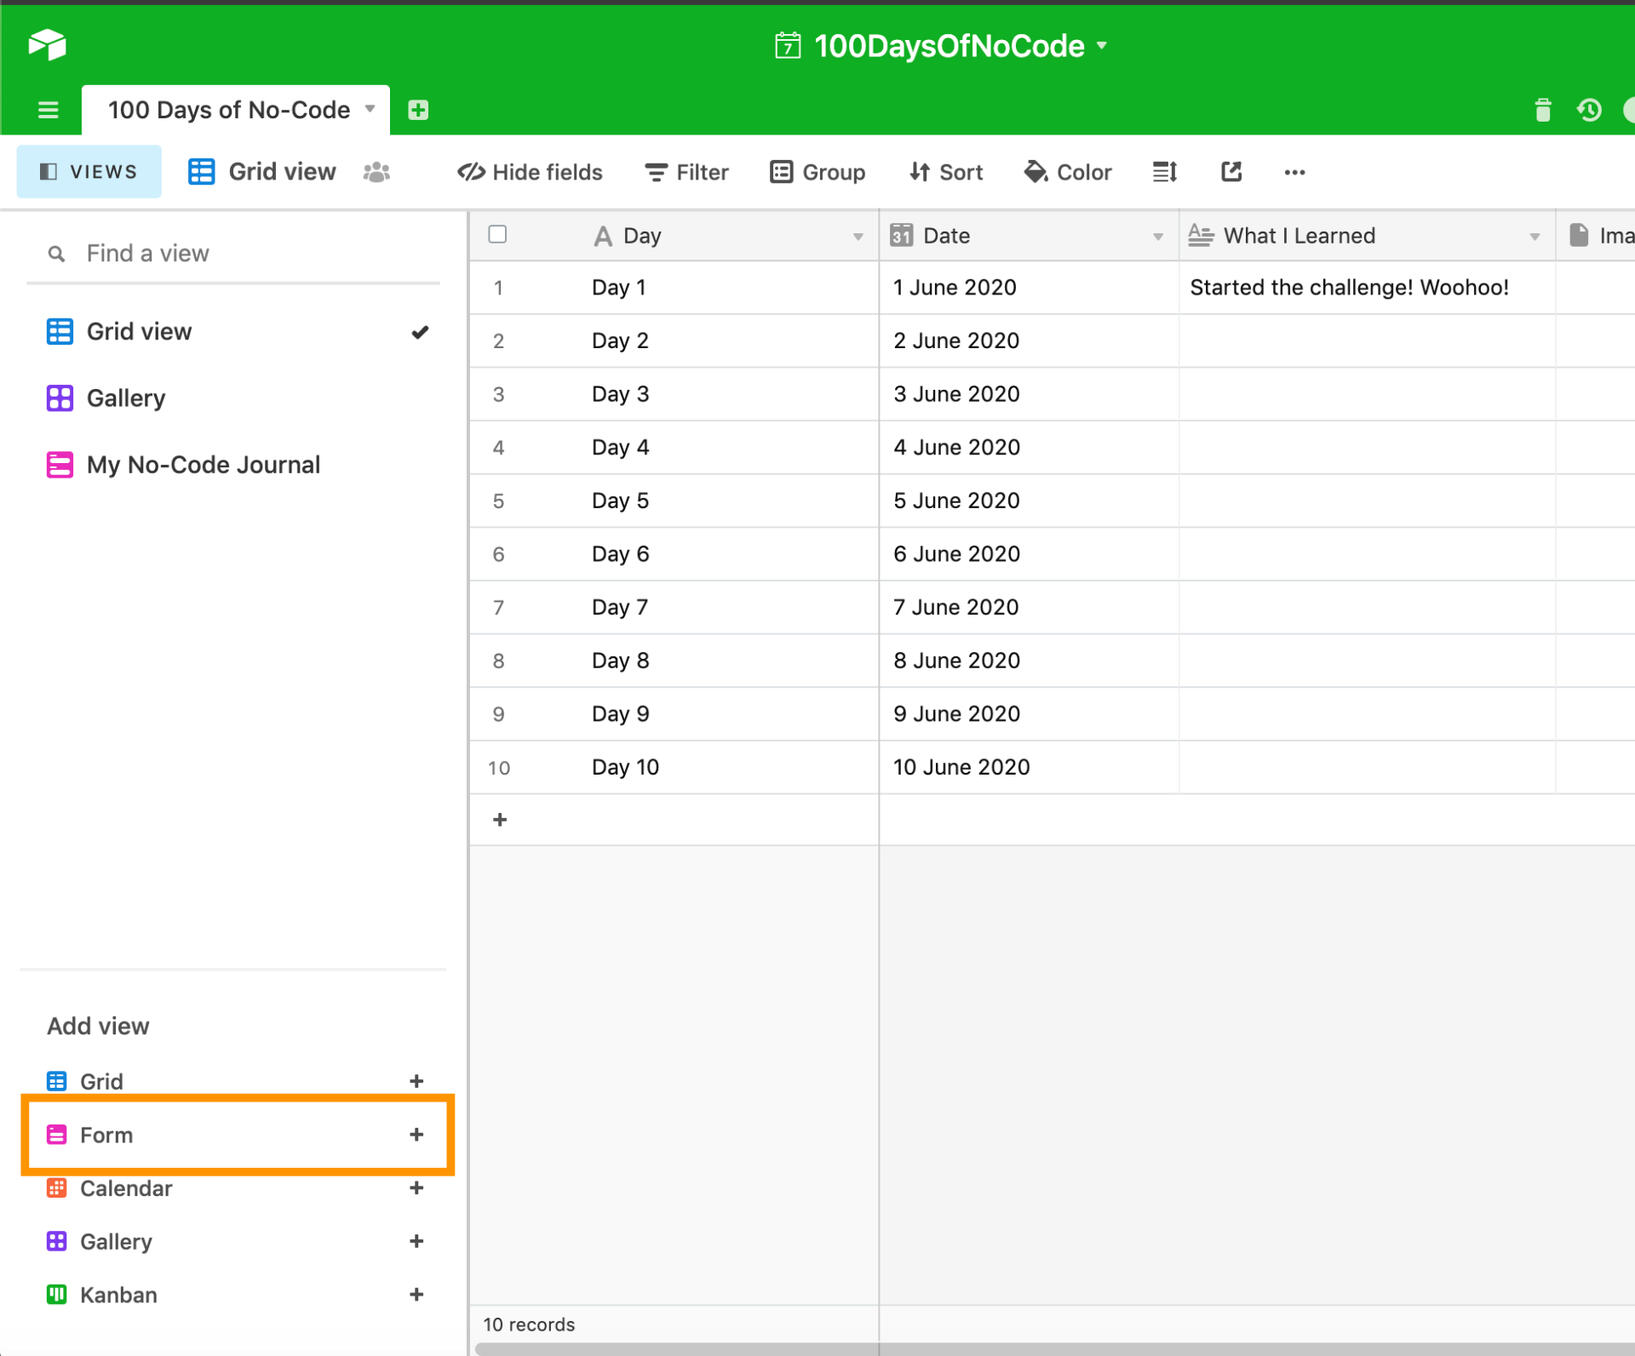
As you can see from the images you can create as many forms as you want for different purposes.What we are creating here is a form for you that you'll fill in each day - kind of like a journal with pre determined questions to answer.
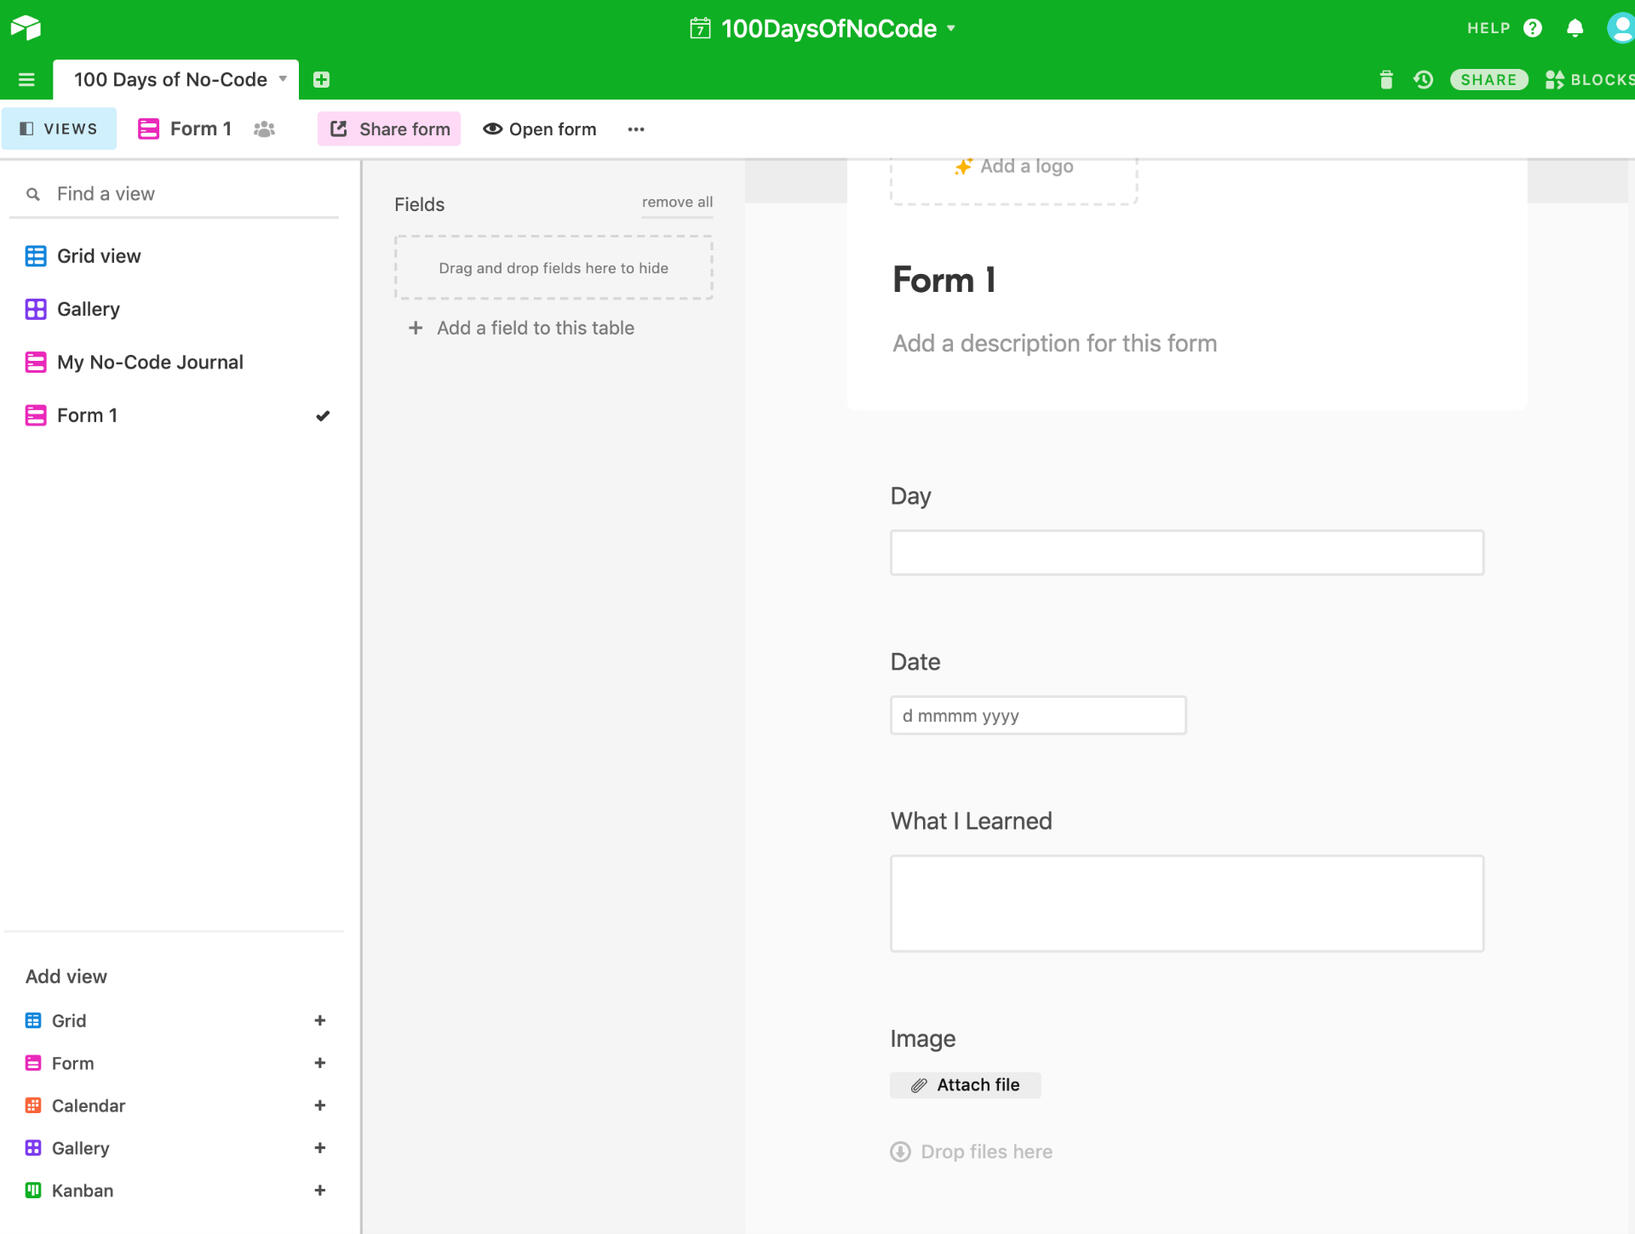
The form view automatically defaults to the names of your spreadsheet columns but this is where you can get creative! Essentially each field links back to your form as a new entry, but you can change the prompt to whatever style suits you.Want to stick with a simple title field? Fine.Or you can ask yourself questions. This might spark some ideas for new fields you never thought of before and that's totally cool! No-code is all about learning and iterating on ideas. Here's one of mine as an example:
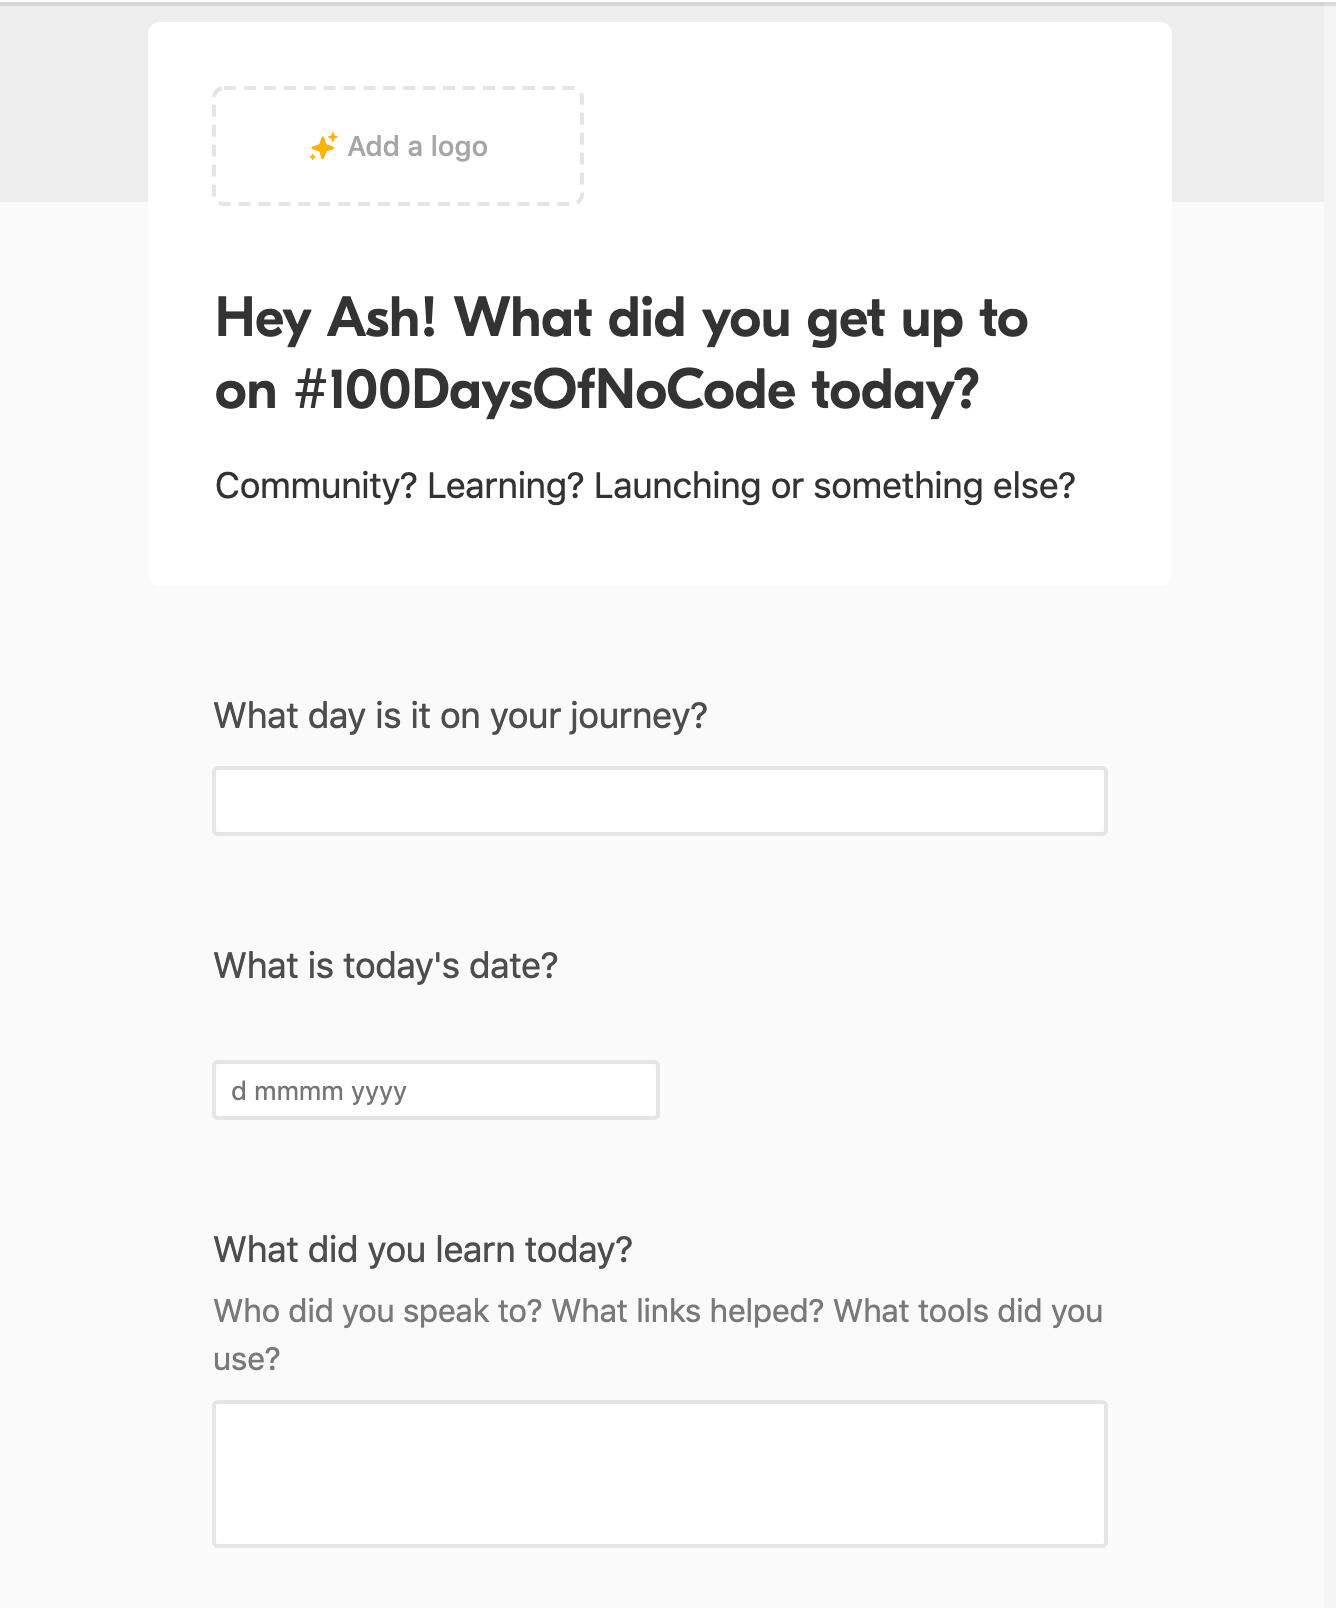
If you upgrade to a pro version you'll notice some extra features and customisations you can add but this will do to get started.
3. Set a reminder
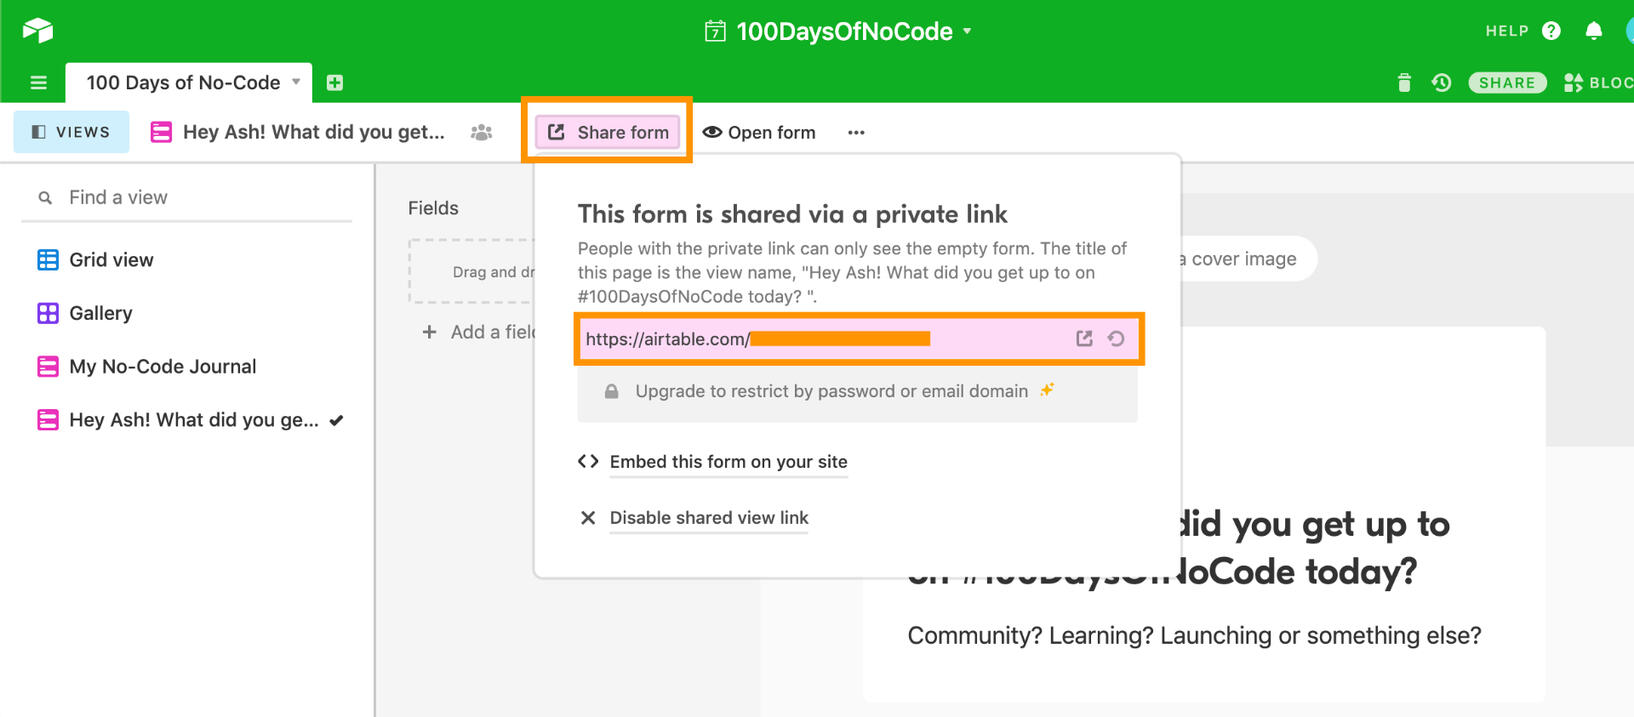
To make the form you just created accessible from anywhere let's first generate a link.We can use this link wherever is easiest to fill in the form - a bookmark on your desktop, a daily to-do app or even just on your home screen.To grab your form's share link click on the 'share form' button and copy the link.Remember this link is accessible to anyone with the URL so best to keep this link your own little secret for now 🤫 😉
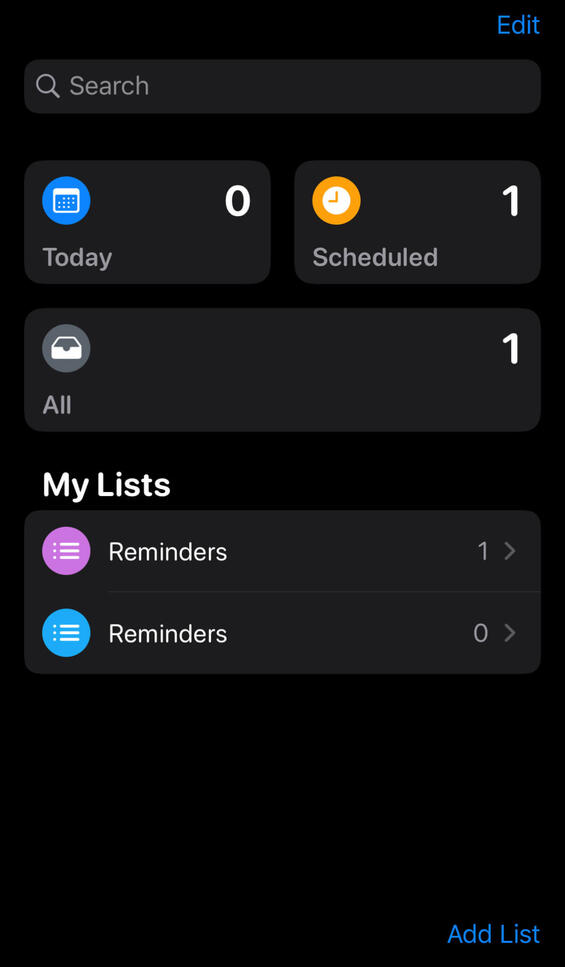
Now it's time to drop this link somewhere that helps you set a reminder to fill it in every day.The easiest for me was my reminders app on my phone.Here's a simple way to set it up in iOS as an example (but any operating system with text based reminders will do).
Head to your reminder app of choice (using iPhone Reminders below)
Enter your reminder along with the URL to your form you just created
Set to get a notification to your phone at a preferred time each day.

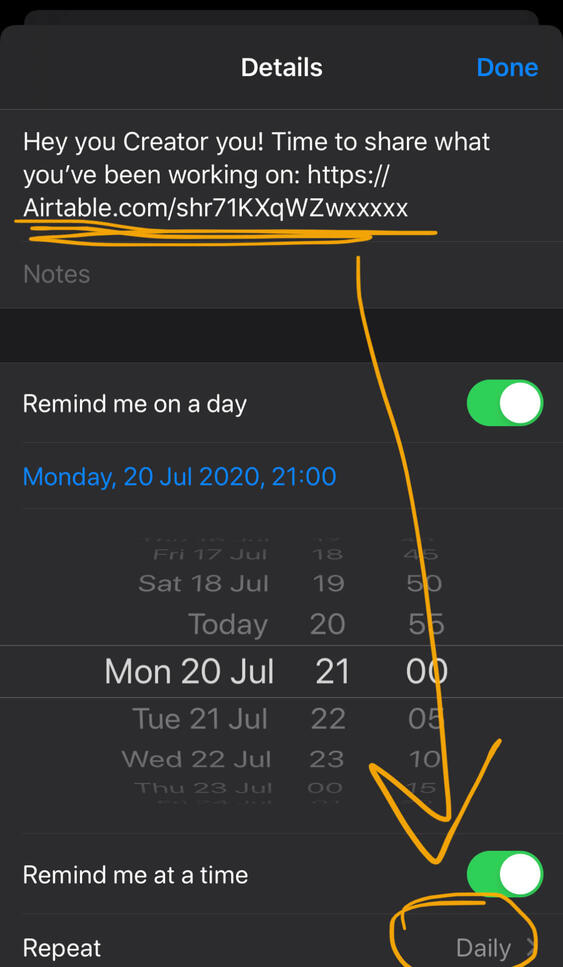
And that's it!Simply fill in your form at the end of the day with your 30 minutes of whatever you got up to and it will automatically be logged for you!
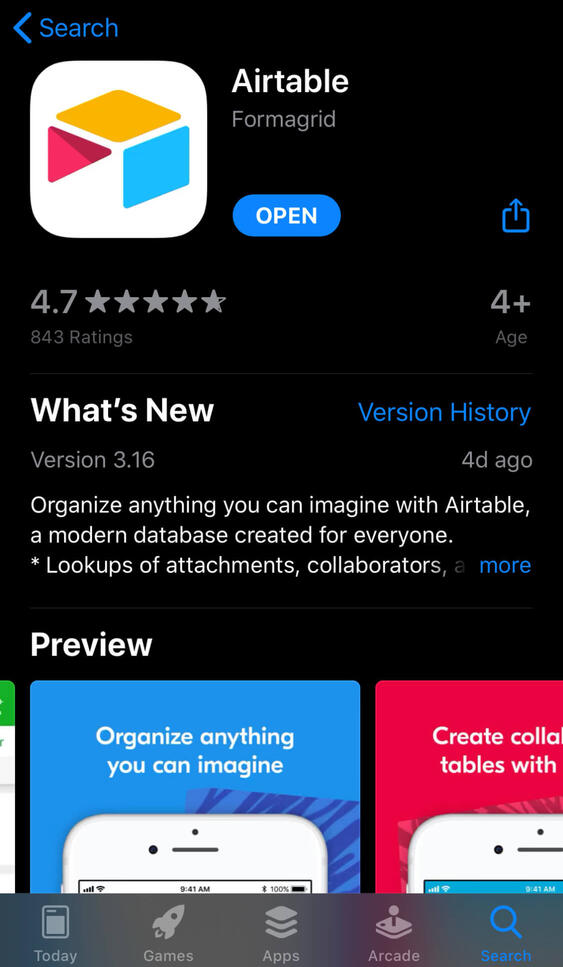
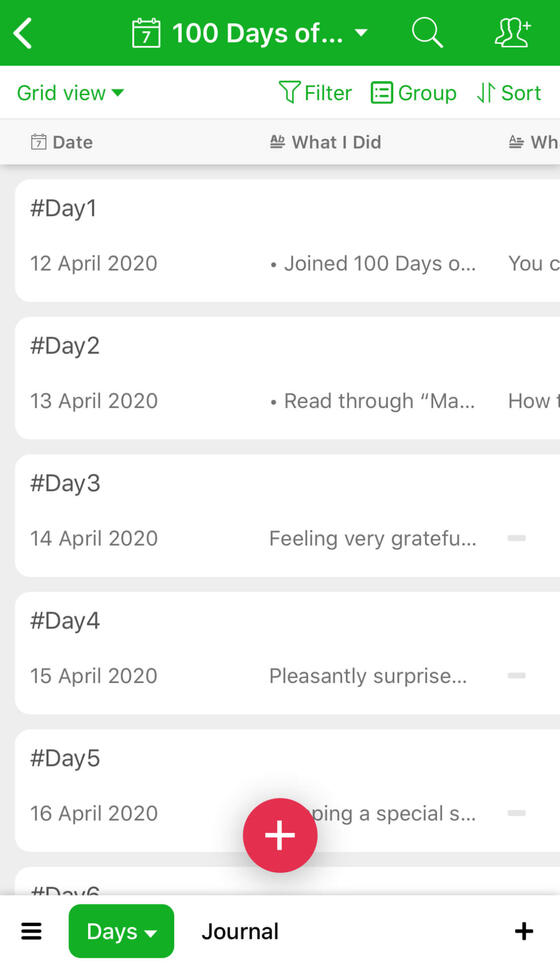
Bonus - Use the Airtable app
If you've been using Airtable for more than just this project and find yourself using it on the go then as an alternative to the steps above you can download the free official Airtable app as an alternative.Below is a screen shot of how the app looks and also how it appears in iOS.
And there you go!You've just applied some of the key principles of habit formation - making it easy and making it satisfying.For more on building habits I recommend checking out the maker community's favourite Atomic Habits. You can read a small summary here.
Part 4: automating your tweets
🛠️ **What you'll make: **
A tiny bot that tweets your daily no-code journal entries for you.📝 **What you'll need: **
Your Twitter account + password at hand
Your Airtable API key
A Zapier OR Integromat account (we'll cover both)
In this section we'll double down on two more skills:
Saving you time by automating a daily task (and reducing your social media time)
Learning about how to use no-code integrations
The Zapier way to schedule tweets
Zapier has been around since 2012 and has been one of the original teams building no-code integrations. They have one of the highest number of integrations and offer a pretty easy free plan to get started.Let's head on over to Zapier.com to get our new automation set up.

1. Make a Zap! ⚡️
An automation here is called a zap.When you log into the dashboard you can make a zap in two ways - via the side menu, or by the quick start area in the middle of the screen.Because it's right there, let's start with the "What do you want to connect today?" section on the right hand side below.
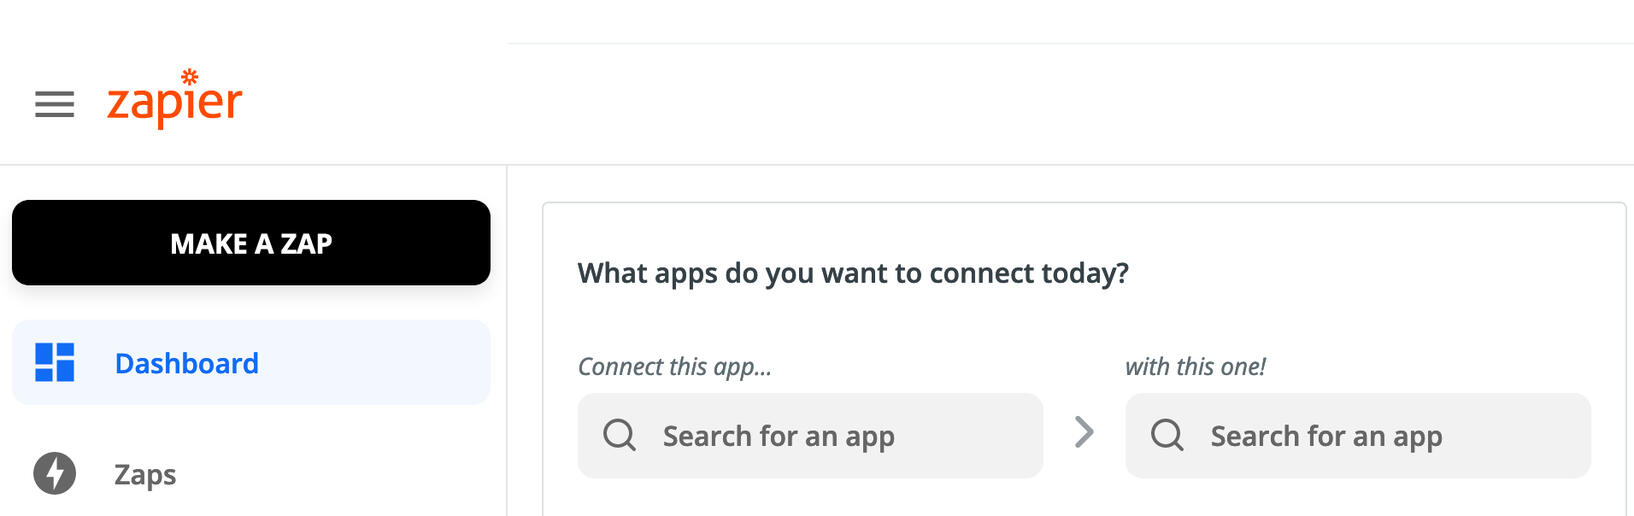
For this feature we're building into our journal we'll be sending an automatic tweet every time we write a new entry in our Airtable journal.In the first search box enter 'Airtable' and in the second box enter 'Twitter'.
You'll see a list of the most popular zaps appear so you can select the zap as shown below.

Welcome to the zap flow.Here's where you connect your apps brick by brick.
Extra Credit
A fellow 100 Days of No-Code challenger Marc did this great write up of using
Here are some others to try:If This Then That
Part 5: designing with canva
🛠️ **What you'll make: **
Assets to personalise your website and make it your own!We'll cover adding video, making a logo and where to find my stash of design tools.📝 **What you'll need: **
Your Twitter account + password at hand
A Zapier account
Before I discovered Canva my primary way of designing was with PowerPoint.There was something missing between the canvas that a blank slide provided and the plethora of features of Photoshop.That's where Canva comes in. It is a fantastic starting point for any maker or small business for personalising and branding your webpage.Let's start!
1. Create your Canva account
If you've found your calling in design - you're in luck!As a subscriber to My No-Code Journal you get access to my collection of design tools!
2. Start with a logo
This is one of the first places makers and founders struggle with personal branding.Software like Canva lets you create multiple variations quickly to land on your preferred style quickly.
3. Create your style guide
Once you've settled on your logo and the core feeling of your site save these details somewhere for reference.Consitieny of your brand
4. Create your brand's assets
If you're expanding your brand further than your own website then you might want to create a variety of social banners and assets.One of the bonuses of Canva is that it does the guesswork for you in terms of sizing these images so they fit nicely in the banner section without being cropped or pixelated.
Bonus - Creating a video background
This was one of the most requested features of My No-Code Journal.I got many "Ash, how do you do the animated background?" questions so let's go over it here.Carrd allows you to put videos as well as images/colours/gradients into your background.Now all we need is a video to put there.You can get videos two ways:
From a stock video site such as Pexels Video
Create a custom animation yourself
To create a custom animation on Canva:a. create your canvas - we'll go with a higher resolution here since it will be for our background.
b. Browse through the animated selection for one that matches your website theme.Tip: Keep it minimal. Too many animations could distract your visitors from your main message.
c. Adjust the placement for the image. Keep in mind this process might be a bit of trial and error depending on how your website will scale on different devices.
d. Export your video using the drop down options above. You can either export as a .mp4 or GIF file.A GIF will tend to be smaller in file size while an mp4 has sharper quality. Feel free to try both and see what works best for you.
e. Once you've downloaded the file remember to compress the video - large file sizes will cause your website to take longer to load and will rack up your user's data usage - not good.I've transitioned to using Compressor on MacOS but there are a number of free mp4 compression sites online. The goal is to get your video to the smallest size possible without compromising quality.
f. Finally, log into
Bonus - Ash's Collection of Design Tools!
If you've found your calling in design - you're in luck!As a subscriber to My No-Code Journal you get access to my collection of design tools!
Coming soon
Wow! You must be really excited to get making!This part of the tutorial is still in development and on its way. If you want to know as soon as it is launched I'll send you a notification for free. Simply enter your deets below:
Thank you!
Your email is making its way through the Internet to land safely in my inbox where I'm looking forward to reading it.Thanks for stopping by to visit My No-Code Journal!
Bonus: embedding with Carrd
*Note this is for Carrd Pro users
1. Get your Airtable embed code
Embedding content allows visitors to see your journal live on your site instead of navigating to an external link.You can embed all kinds of content once you've had practice with this block but let's start by getting introduced to this feature.For simplicity we'll add the table below your profile to start but you can always change the placement later.
To start with you need an embed code from your journal. This is like a URL but with extra information to re-create the page directly in your website with details like width, height, background colours and filter features.
Hop over to your journal in Airtable and find the share button.
To use this feature click on the + icon in the menu and select 'Embed'.
A new element will appear so let's go to the editor and add our Airtable code.
Are you sure you finished all the steps?

Congrats! You're now officially a no-code maker!Not only that but you've set yourself up for success by creating a space to log and share your progress.What's next for your no-code journey?Feel free to message me with what you want to see in the future or what you want help with.Have any feedback about how I can improve the tutorial? Drop it here.